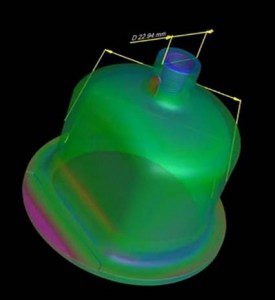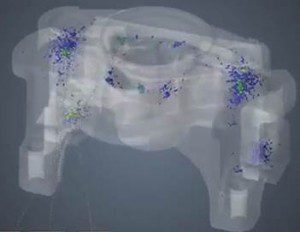
Part to CAD overlay determines overall dimensional integrity. Parts are analyzed for similarities and differences and color coded showing deviations between internal and external geometry.
As an industry, we are highly aware of computed tomography (CT) scanning for diagnostics for patients. But these devices are valuable to the device manufacturing industry as well—particularly for examining micron level requirements. Using the technology can help manufacturers speed development and innovation, as well as improve quality and accuracy.
According to Keith Calvert, director of engineering at The Tech Group, a CT scanner provides detailed, three-dimensional scans of components and component assemblies to a resolution of four microns. It generates a dimensional overlay of a medical part against 3D CAD data, and provides measurements of part-to-part or part-to-steel interactions, as well as other comparisons. CT scanning measures the internal cavities, undercuts, and deep recesses that can’t be captured by CMMs and laser scanners without dissecting the part. CT scanning is often used when a part’s requirements exceed the capabilities of laser scanning.
Scanners can be used in a variety of ways, including flaw detection, failure analysis, metrology, accuracy of assembly, and reverse engineering applications.
Damage free parts
The main advantage of using CT scanning is the ability to capture external and internal surfaces for complex or free from parts without damaging the product. This is a significant need for parts made via 3D printing, for example. Custom-made products have to be tested for accuracy and CT scanning enables visual access to all surfaces.
“We are able to capture 100% of the surface data,” Calvert says, noting that CT scanning saves time and effort.
“The ability to inspect the interior of devices without disassembling them can dramatically reduce the time needed for inspections and analysis, thereby reducing operating costs and allowing companies to be more competitive,” he tells us.
Calvert also notes that using CT can reduce development time. It allows internal components to be prototyped and replicated quickly by transforming the scanner data into a 3D CAD file.
“Prototypes and full production can be completed in far less than time ever before,” he says.
Specifications are validated with CT scanning which accelerates the design and development process.
“Many scans can be completed in a matter of minutes, dramatically changing the nature of preproduction and validation timelines,” Calvert says.
Improving product quality and accuracy
“Parts with small and complex geometry from the medical and electronics industries are very difficult to measure using even the most advanced laser-based scanning or CMM technologies,” says Calvert. Industrial CT scanning is essential for precision measurements. It can provide accuracies on small parts of +/- .010mm and accuracies on larger parts of +/-.025mm. Minor defects are quickly identified using 3D imaging, enabling product development teams to gain insight into design flaws and make changes to improve the reliability and quality of the final product.
Calvert warns that fitting CT scanning into the process can take some getting used to.
“There is a potential bottleneck associated with the programming required prior to scanning.” However, he says, once a program is written for a given drawing, it can be transferred to a traditional CMM for use during production.
We asked Calvert 6 questions about CT scanners every engineer should know the answers to. Here’s what he had to say:
- Should medical manufacturers purchase a CT scanner, or is it better to use a service provider or partner’s facilities? Large purchases of this kind should be scrutinized carefully. I would recommend working with a service provider or partner. The knowledge gained through this relationship can help in the purchasing decision. For large OEM’s who design, manufacture, or reverse engineer products daily the decision to invest should come down to the value proposition gained.
- In what scenario does a CT scan purchase make sense versus hiring a supplier? Risk Management of Intellectual Property. Many OEMs today are designing their own devices. The need to closely guard their IP is critical when the space they are operating in has a lot of competition. It may make sense to purchase verse risking their IP.
- What is the price of a CT scanner? Scanner costs range from $450k-$900k and is primarily dependent on the X-ray tube power needed for the job.
- How can an engineer make the case to their company that it makes sense to buy it? One method of justification for the purchase should surround Return on Invested Capital (ROIC). Figure out how quickly the capital payback is realized based on utilization and value add.
- What sort of training is required to mitigate the programming bottlenecks? Candidates identified for CT programmer training need to have a solid 3D CAD modeling and GD&T working knowledge base. This will enable them to fully understand the tools and specifications required to write the program.
- What are the next steps for an engineer who’s interested in figuring out if it will work for her processes? Target specific focus points (bottlenecks) or process that would significantly improve or increase its value due to the value proposition gained from CT. Work with a service provider who can provide you with clean data to analyze to make an informed decision.


